Looking for some half term craft ideas? Look no further!
At Bright Ideas Crafts we know that half term comes around very quickly, and that it’s not always that easy to find stuff to do to keep the kids busy without spending a fortune! Yes, okay as parents we know they’d probably prefer a trip to Alton Towers or the local indoor play centre, but that’s not something you’ll want to do or be able to do all day every day during half term – it can be very expensive!
So we’ve put our heads together, trawled the internet and come up with 5 fantastically simple but effective half term craft ideas to keep you and the children busy this half term! And what’s more, none of these ideas will break the bank, but they will keep the little ones occupied and you never know, they might even gift their makes to you when they’re finished. What’s more rewarding that receiving your very own half term craft ideas, having helped to make them in the first place!
Read on to find out more and to find out who we’ve taken inspiration from for these half term craft ideas…
MAKE 1 – Plastic Egg Birds – this make is from Stacey at Glued to my Crafts:
Easter is far from our minds by now but you still might have some plastic eggs from your egg hunt adventures laying around.
Before you throw them away – why not check out the below crafty Plastic Egg Birds tutorial to see how you can “recycle” them and make some one-of-a-kind birds that are perfect as keepsakes AND spring decor!
With just simple supplies, a little imagination and a crafty touch – you too can pull this together with your child within minutes! So lets grab those craft supplies and get to work! Happy crafting my “chirping” friends!!!
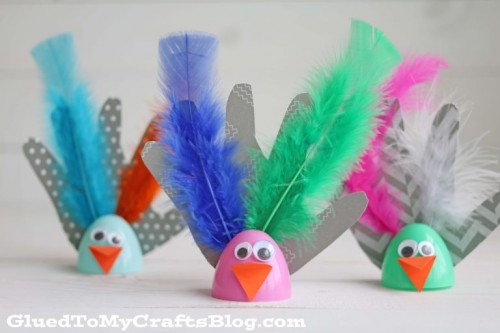
Here’s what you’ll need:
- Plastic Eggs
- Hot Glue Gun (please use adult supervision)
- Pretty Scrapbook Paper
- Orange Cardstock (or any other colour you want to use for the beak!)
- Marker Pen
- Scissors (please use adult supervision)
- Colorful Feathers
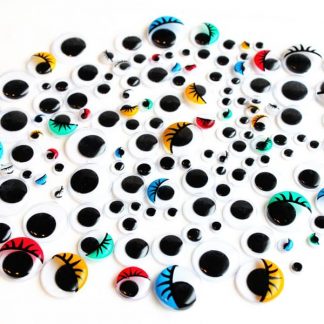
- Wiggle Eyes
Directions:
- First separate your eggs. Each half will be a “bird.” Set them all aside
- Next grab your scrapbook paper and marker. Carefully trace around your child’s hand (one handprint per bird), then grab your scissors and cut it out. Repeat for each bird you want to make
- Now get your glue gun hot and ready. With help, have children decorate their handprint cutout with some colorful feathers and any other embellishments they see fit
- Once that piece is decorated and it’s dry enough, it’s time for the final steps!
- Go ahead and hot glue your handprint piece to your egg half to give the look of wings. At this time you should also hot glue the wiggle eyes and a triangle beak onto the plastic egg (don’t forget to add any other embellishments you see fit at this stage!)
- Then once done decorating, let the hot glue dry completely and display proudly!!!
MAKE 2 – Lolly Stick Pirate Flags – this make is also from Stacey at Glued to my Crafts:
Ahoy, matey!!! Are you ready for another simple kid friendly craft today? Well let’s batten down the hatches and check out this fun Lolly Stick Pirate Flags tutorial!
This is a super easy, inexpensive and fun make! Well shiver me timbers – it’s the perfect craft for those young pirate lovers and it’s sure to get you in the mood of talking and acting like one too! So put everything away on the “ship” and tie everything down because a storm is brewing in the craft world! Happy crafting laddies!!
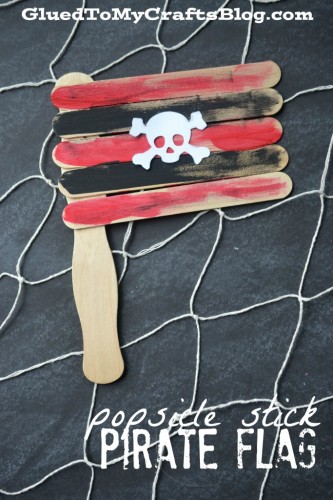
Here’s what you’ll need:
- Jumbo Lolly Sticks (for the body of the flag)
- Wavy Paddle Fan Sticks (for the flag pole)
- Large Skull Paper Punch
- Glue
- Red/Black Paint
- Paint Brushes
- White Cardstock
Directions:
- First assemble the base of your flag by gluing six popsicle sticks in a straight line, on a wavy paddle fan stick (see above picture for example). Set aside to let it dry completely. Repeat for each flag
- Next have your child paint the “stripes” of the lolly stick flag, alternating between red and black
- Now grab your white cardstock and punch/cut out a pirate skull design
- To finish off the Lolly Stick Pirate Flags craft, have children glue the cardstock piece in the centre of the flag. Then display proudly or use a photography prop!!
MAKE 3 – Paper Plate Clown – another make from Stacey at Glued to my Crafts:
No clowning around today – here’s another kid craft idea involving paper plates!!
If you’ve been a long time of follower of Stacey’s, you probably know by now that paper plates are her favourite craft supply when it comes to kid crafts. They are really inexpensive, readily available AND just an overall great starting point when it comes to crafting with kids.
With today’s Paper Plate Clown tutorial, you are sure to have a great time AND have a beautiful piece to show off with your child afterwards. Make it today (or any day of the year) – just get up and DO IT! Happy crafting my friends!!!
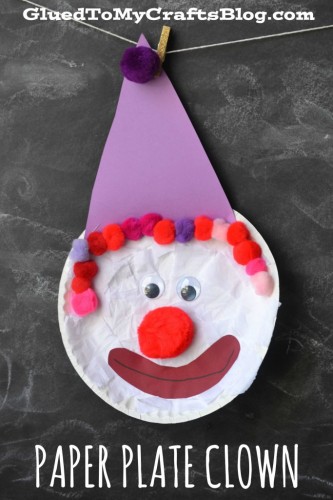
Here’s what you’ll need:
- Large Paper Plate
- White Tissue Paper
- Cardstock (we used purple/red but you can use any colour you like!)
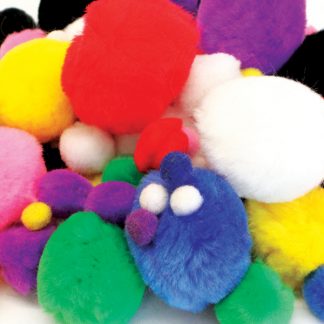
- Various sizes and colors of pom poms (we’ve gone for the assorted pack but feel free to mix it up with some other colours if you want to!)
- Wiggle Eyes
- Stapler
- Scissors (please use adult supervision)
- Glue
Directions:
- First cut your white tissue paper into small squares (let the kids practice their cutting skills, but supervise them just in case!). Set aside
- Next take your paper plate and put a good amount of glue all over it. Have children place the tissue paper on top of the glue, until the paper plate is completely covered. This is the clown’s face mask
- While they are working on that, cut out the other clown features from the cardstock (hat, big red mouth etc)
- To finish off the Paper Plate Clown – staple/glue on the cardstock pieces in their designated spots and finish off with a line of pom-pom hair for the clown on the top. At this point, you can add other embellishments you see fit to give your clown that one-of-a-kind look! Then display proudly!
MAKE 4 – Handprint Flower Cards – more half term craft ideas from Stacey at Glued to my Crafts:
If you are looking for an easy keepsake idea for the kids to make and gift to mums & grandmas (ideal for Mother’s Day), or just because you want to show them how much you love them during the half term, today’s Handprint Flower Cards tutorial is just for you!!!
So with that being said, not only are these DIY cards super simple to assemble (even for a beginner crafter) but they are really inexpensive and have that handmade touch, that makes them so impressive too! Now grab those craft supplies, check out the full tutorial below and create some one-of-a-kind pieces with your child today!
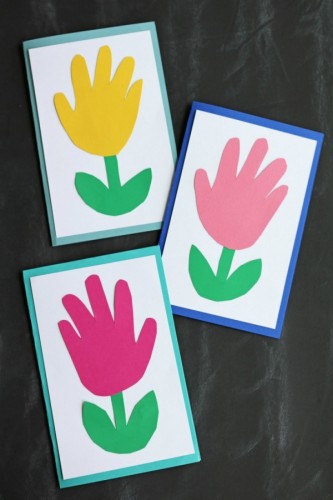
Here’s what you’ll need:
- Colored Cardstock (most importantly GREEN)
- Pre-folded Cardstock Cards
- Sticky tape
- Scissors (please use adult supervision)
- Pen
Directions:
- First trace your child’s hands on some colored cardstock with a pen. Trim out. Repeat for each card you want to make
- Grab some green cardstock and cut out a simple stem & leaf shape for your flower design. Repeat for each card you want to make
- Next grab your remaining cardstock and trim out a rectangular piece that is slightly smaller and will fit on the front of your pre-made cardstock card. Go ahead and use your adhesive tape to secure that piece to the front of your card. To finish your Handprint Flower Cards, secure your handprint cutout (the flower bud) and stem cut-out to the front of your card to give the look of a flower. At this point in time you can also add other embellishments like glitter and rhinestones, before gifting away!!!
- TIP: This idea can be easily made in bulk, stacked and tied together for a blank note card gift idea. Remember you can also add some flair and a one-of-a-kind look by skipping the solid cardstock colors and going with scrapbook paper that is fun patterned or even glittered!
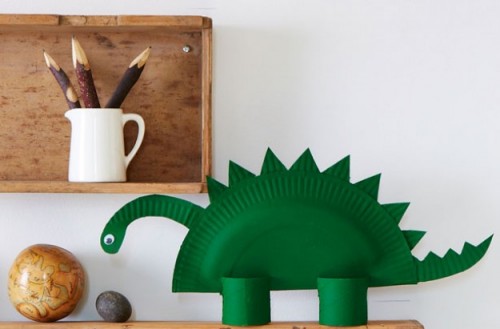
MAKE 5 – Paper Plate Dinosaur – this make is from GoodtoKnow:
If you’ve got some dino fans in your house then we think this craft just might go down a treat. Quick and easy to make, this papercraft is perfect to make with little ones from around 3 years old and up – just remember the plastic table cloth!
The kids will love getting messy painting their own paper dinosaur and designing its face. What do you think they’ll opt for? Cheeky, sleepy or maybe scary? You’ll have to have a go at making some to find out we guess…
You will need the following:
- Large paper plate
- Scissors (please use adult supervision)
- Pencil
- Glue
- Toilet roll
- Acrylic paint
- Paint brush
- Wiggle eyes
How to make a paper plate dinosaur:
- Fold a large paper plate in half, and cut into 2 to create the ‘shell’ of your dinosaur
- Take one half of the plate and draw and cut a head, a tail and triangular spikes in whatever shapes you fancy. Glue these to the second half of the plate to start to create the template for your dinosaur
- To make the feet, measure and cut a toilet roll into 3. Take 2 pieces and cut slits in the top on opposite sides. Insert the dinosaur’s body onto the feet so it’s stable and can stand
- Paint the dinosaur with your chosen colour of acrylic paint and leave to dry – this could take a few hours
- Add a wiggle eye to the dinosaur’s head to give yours some character and a face with personality. Now all that’s left to do is to name your new pet!
So there you have it – five very easy, very cheap half term craft ideas that the kids are bound to enjoy creating! Remember, as with all of our craft makes, you’re limited only by your imagination, so if you want to embellish to your heart’s content then make sure you do so!
Happy school holidays and happy crafting with our half term craft ideas!
The Bright Ideas Team x
Please note, the copyright for all images sits with Glued to my Crafts or GoodtoKnow.